
It doesn’t matter in case you are new to Web3 improvement or have earlier expertise throughout the trade; everybody ought to know that the quickest technique to construct a Web3 app is with Moralis. If you wish to be taught extra about this, be part of us as we present you the right way to construct a Web3 app in minutes! Furthermore, you even have the choice to skip the tutorial and soar straight into the code. You will see that your entire code for the dapp we’re about to create under:
Full Boilerplate Repository – https://github.com/ethereum-boilerplate/ethereum-boilerplate
The repository above gives the main Ethereum boilerplate from Moralis, one of many instruments contributing to a extra seamless developer expertise. Additional, this template makes it attainable to construct a Web3 app a lot faster than common! Furthermore, regardless that the identify comprises “Ethereum”, the boilerplate is suitable with any EVM chain and even Solana. As such, you too can use the Ethereum boilerplate to, for instance, construct a Polygon dapp. These accustomed to Moralis will already know that it’s the quickest technique to construct on Web3.
The boilerplate – together with instruments reminiscent of Moralis’ Web3 Authentication API – contributes to the accessibility that Moralis provides. For instance, the Auth API makes Web3 authentication seamless, permitting you to implement a number of EIP-4361-compatible authentication mechanisms.
So, if you wish to construct a Web3 app shortly and seamlessly, ensure to enroll with Moralis instantly. Creating an account is freed from cost, and you can begin constructing thrilling blockchain initiatives in a matter of minutes!
What’s a Web3 App? – Web3 Apps Defined
Earlier than we present you the right way to construct a Web3 app, it would – at the least for the uninitiated – be helpful to return to fundamentals and discover what a Web3 app is. Nevertheless, in case you are already accustomed to most of these functions, be happy to skip this preliminary half and instantly dive into the method of constructing a Web3 app within the part under!
Web3 apps, or as they’re usually referred to, dapps (decentralized functions), are very like conventional functions. Nevertheless, the first distinction is that dapps have Web3 and blockchain performance. That is a direct impact of builders constructing dapps on P2P (peer-to-peer) networks like Ethereum. As well as, Web3 apps use sensible contracts, which opens up an abundance of alternatives for modern new options to emerge and revolutionize a number of sectors of the financial system.
A central attribute that the identify “decentralized functions” reveal is decentralization. Which means that Web3 apps usually are exterior the management of a single authority or entity. Moreover, the decentralized nature of this new technology of functions ensures, amongst different issues, that no single level of failure exists. Accordingly, this will increase safety for customers and makes dapps much less susceptible to censorship.
What’s extra, together with being censorship-resistant and safer, there are different advantages to dapps. For instance, since Web3 apps are blockchain-based and make the most of sensible contacts, it turns into simple to combine cryptocurrencies right into a dapps’ performance. Furthermore, it isn’t unusual for Web3 apps to be open-source. This positively influences the entire group as it’s a driver of innovation.
Nonetheless, with a fundamental understanding of blockchain apps, it’s time to transfer on to the central half, the place we are going to illustrate the right way to construct a Web3 app!
Learn how to Construct a Web3 App with Moralis
With a extra profound understanding of Web3 apps, it’s now time for the central matter, the place we are going to present you the right way to construct a Web3 app. The Web3 app you’re about to construct will permit customers to log in utilizing their Web3 wallets. As soon as authenticated, they will view their transaction historical past, balances, and extra. Nevertheless, extra on this later.

To provoke, we are going to discover Moralis’ Ethereum boilerplate. This may illustrate what you’re working in the direction of and what the ultimate product will seem like. Furthermore, due to the Ethereum boilerplate, it is possible for you to to construct a Web3 app in solely three steps:
- Clone the Boilerplate
- Configure Atmosphere Variables
- Begin the Web3 App
The steps above make it attainable to construct a Web3 app in minutes! Nevertheless, earlier than we get going with the tutorial, the very first thing you will want to do is create a Moralis account. To enroll with Moralis, you should click on on the “Begin for Free” button on the prime of the Moralis web site:

From there, you should fill within the mandatory info and hit ”Signal Up”:

Now, with a Moralis account at your disposal, we will progress with this ”the right way to construct a Web3 app” tutorial by exploring Moralis’ Ethereum boilerplate!
Construct a Web3 App – Moralis’ Ethereum Boilerplate
To start out, we are going to discover Moralis’ Ethereum boilerplate in additional element, enabling you to construct a Web3 app! Additionally, this may illustrate what you’re working in the direction of. Nonetheless, when somebody launches your dapp, they are going to arrive on the following touchdown web page:
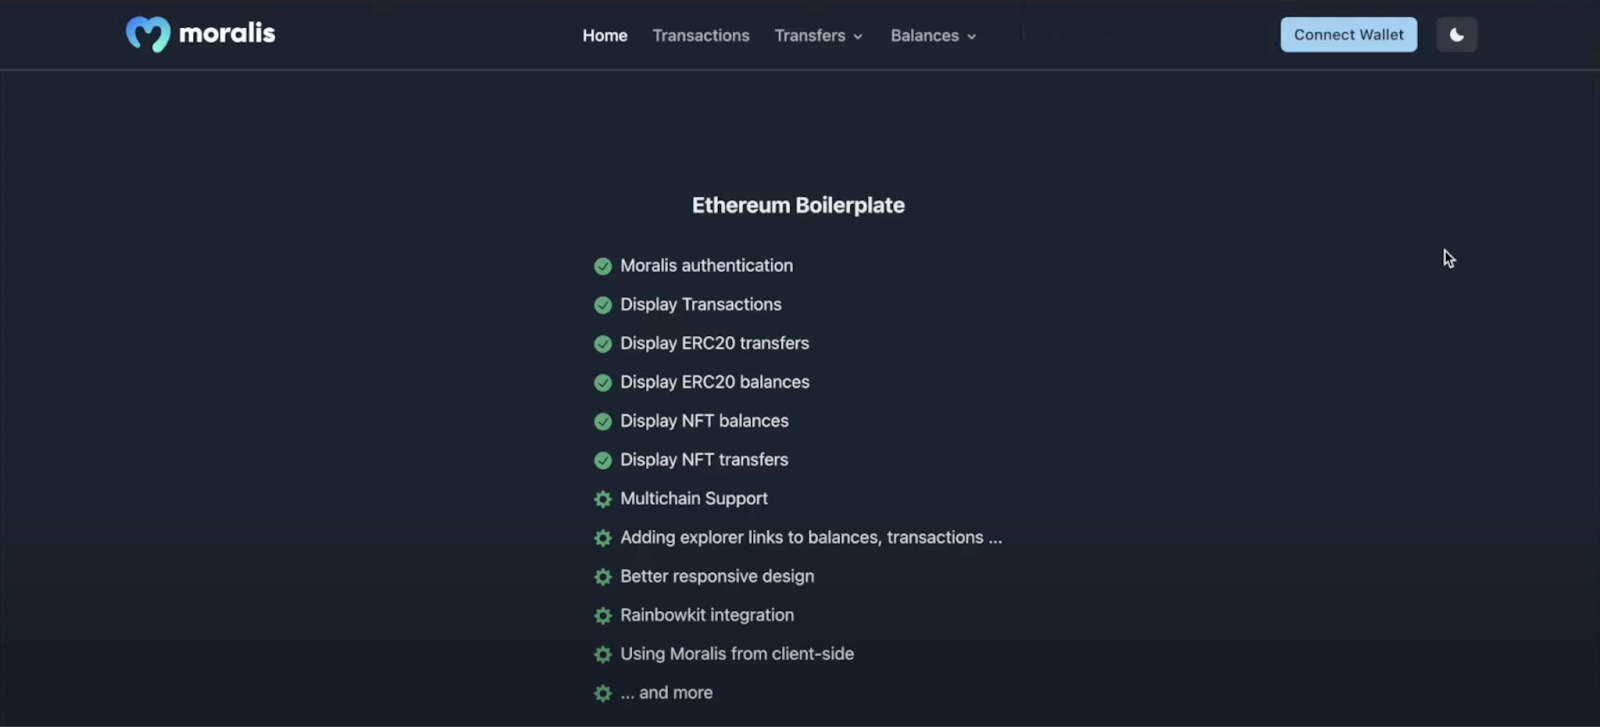
Because the picture above illustrates, there’s a navigation bar on the prime of the Web3 app. Additionally, you could have 4 choices to select from: “House”, “Transactions”, “Transfers”, and “Balances”. Nevertheless, these is not going to present a lot info earlier than figuring out your Web3 identification with a pockets. To authenticate your self, you will want to click on on the “Join Pockets” button:

As quickly as you press this button, it should set off your MetaMask pockets. From there, it is possible for you to to signal a message. When authenticated, the Web3 utility will populate with info associated to your pockets. So, should you now had been to click on on the “Transactions” tab, it ought to show your transaction historical past in a desk:

Along with transactions, you possibly can click on on both “Transfers” or “Balances”. Each these tabs characteristic a drop-down menu permitting you to decide on between “ERC-20” and “NFTs”. For instance, that is what it ought to seem like should you click on on “Balances”:

For those who had been to go for the “NFTs” possibility within the “Balances” tab, it ought to show your NFTs in a neat desk:

The identical rules apply to the “ERC-20” various and the “Transfers” tab alike. Furthermore, the boilerplate moreover encompasses a darkish and lightweight mode. As such, you’ll have the choice to change between these utilizing the button on the far proper:

Now that you realize what we’re aiming towards, we are going to illustrate the right way to shortly construct this Web3 app. So, with no additional delay, let’s soar straight into step one and uncover the right way to clone the Ethereum boilerplate!
First Step: Clone the Boilerplate
The very first thing you will want to do to construct a Web3 app is open your favourite IDE or built-in improvement atmosphere. We are going to use VSC (Visible Studio Code). The method may differ considerably in case you are utilizing one other atmosphere. Nevertheless, fear not; there’ll probably not be any main variations anyhow.
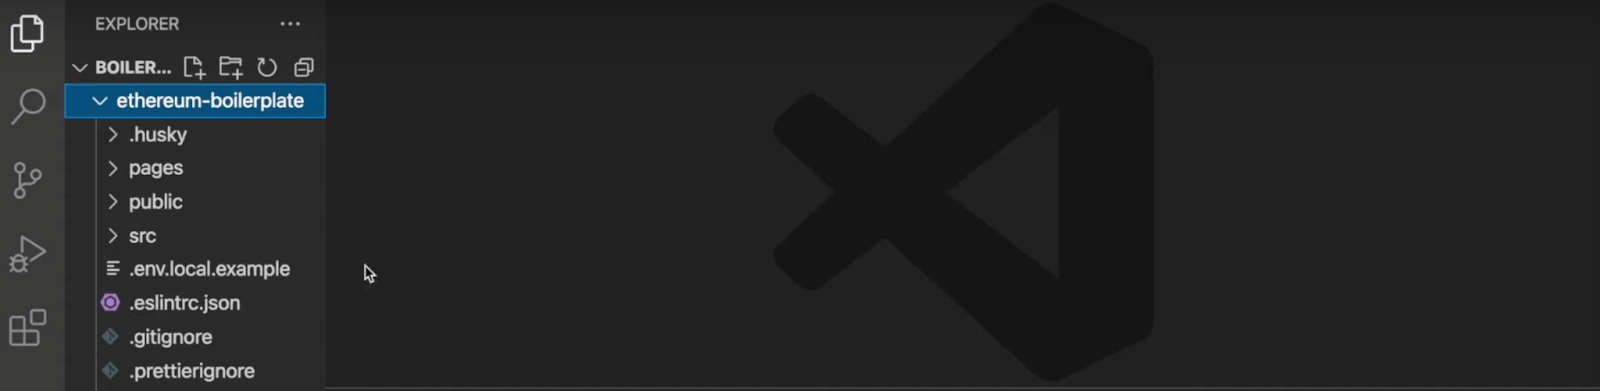
When you launch your IDE, you could create a brand new folder. You’ll be able to name this folder no matter you desire to, and in our case, we are going to identify it “BOILERPLATE”. With the folder at your disposal, you will want to navigate to the GitHub repo, which you will discover within the introduction or outset of this text. From there, you possibly can click on on the “Code” button to the suitable and duplicate the repo URL:

Upon getting copied the URL, you possibly can navigate to your IDE and open a brand new terminal. To take action (in case you are utilizing VSC), you possibly can click on on the “Terminal” tab on the prime and hit “New Terminal”:

Now, with a brand new terminal open and the repo URL at your disposal, you possibly can clone the venture utilizing the next command (ensure to run the command within the location of the folder you created earlier):
git clone “BOILERPLATE_URL”
After working the command above utilizing the Ethereum boilerplate code, you possibly can navigate to the proper folder by means of this command:
cd ethereum-boilerplate
For those who adopted alongside and inputted the proper instructions in the suitable location, it is best to have a construction that appears one thing like this:
Second Step: Atmosphere Variable Configuration
With the venture obtainable in your native listing, it’s now time to make a couple of configurations for the atmosphere variables. As such, you possibly can go forward and open the ”.env.native.instance” file:

As you possibly can see above, you will want to configure some variables. Let’s begin on the prime with the “APP_CHAIN_ID” variable. Initially, it’s set to “0x1“, which corresponds to the Ethereum mainnet. If you wish to create dapps for Ethereum, you possibly can depart this one as is. Nevertheless, Moralis is cross-chain suitable. This implies you possibly can develop dapps for different chains alike. You will see that all supported chains right here if you would like extra info.
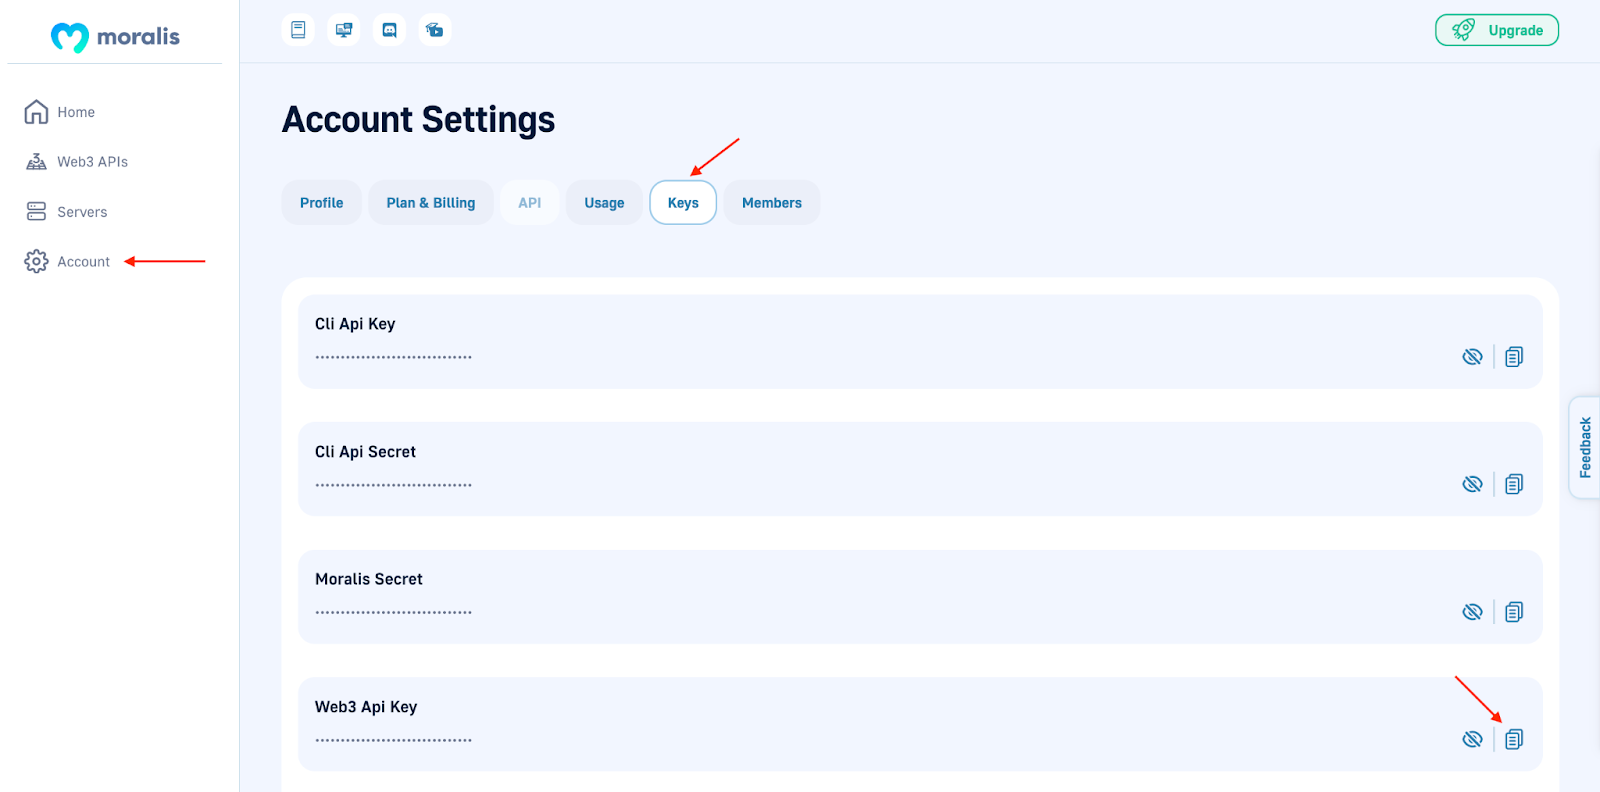
The next variable you could configure is “MORALIS_API_KEY“. To accumulate your API key, log in to your Moralis account and navigate to the admin panel. From there, you possibly can click on on “Account” to the left, press the “Keys” tab, and duplicate “Web3 Api Key”:
With the important thing at your disposal, you possibly can merely set the “MORALIS_API_KEY” variable to equal this worth. Subsequent, you should add a price to “NEXTAUTH_SECRET“. For those who need assistance with this, you need to use the next hyperlink to create a brand new secret: https://generate-secret.now.sh/32.
Lastly, “NEXTAUTH_URL” is at present set to “http://localhost:3000“. In the intervening time, it’s high-quality to go away it as is. Accordingly, it should will let you check the applying on a neighborhood host. Nevertheless, whenever you plan on launching the dapp, it must be modified to the dapp’s URL.
Furthermore, earlier than we present you the right way to begin the dapp, you could change the file’s identify to ”.env.native”. The ultimate code of your ”.env.native” file ought to look one thing like this:
APP_CHAIN_ID=0x1
APP_DOMAIN=ethereum.boilerplate
MORALIS_API_KEY= "YOUR_API_KEY"
NEXTAUTH_SECRET= b8e786967d7bcbc0f920d35bcc3f891c
NEXTAUTH_URL=http://localhost:3000
Third Step: Begin the Web3 App
With the configuration accomplished, the following step is to begin the dapp. Nevertheless, earlier than launching the dapp, you will want to put in dependencies. Furthermore, relying on in case you are utilizing “yarn” or “npm“, you possibly can enter both of the next into the terminal:
npm i
yarn
From there, all that is still is to execute this command to run the applying on a neighborhood host:
npm run dev
yarn run dev
If you wish to entry the Web3 utility and guarantee the whole lot features, you possibly can launch the dapp by means of the URL you beforehand specified: http://localhost:3000.
That’s it! You now know the right way to construct a Web3 utility utilizing Moralis in three easy steps. It’s now as much as you to tailor this template by including or eradicating options your potential prospects need/don’t want. Nonetheless, utilizing the Ethereum boilerplate lets you launch an utility shortly, and it would present a first-mover benefit!
For those who skilled hassle throughout this tutorial or need to watch a video explaining the method as an alternative, ensure to take a look at the next clip from Moralis’ YouTube channel:
Learn how to Construct a Web3 App – Abstract
For those who adopted alongside all through this text, you now know the right way to construct a Web3 app. Because of Moralis and the Ethereum boilerplate, you had been in a position to create the dapp in a matter of moments. In actual fact, you may achieve this in document time by using the next steps:
- Clone the Boilerplate
- Configure Atmosphere Variables
- Begin the Web3 App
For those who discovered this information fascinating and wish extra thrilling content material, try Moralis’ Web3 weblog. The weblog options contemporary and fascinating content material that’s up to date every day. For instance, you possibly can study several types of DAOs or the right way to construct a decentralized social media profile!
Moreover, it is best to try the official Moralis documentation. There, you will see extra tutorials on how Moralis works. For instance, you possibly can discover the Solana API, which lets you construct distinctive initiatives for the Solana community. It’s also possible to discover the Moralis Web3 Streams API, enabling you to obtain webhooks on any community.
Furthermore, in case you are new to the trade, you possibly can be taught the fundamentals of Web3 improvement at Moralis Academy. The academy provides incredible blockchain programs for each freshmen and extra skilled builders. For instance, enroll within the “Blockchain & Bitcoin Fundamentals” course to get going!

If this text piqued your curiosity in exploring the Web3 improvement sector additional, enroll with Moralis! Creating an account will present fast entry to the platform’s instruments, making your future improvement endeavors considerably extra seamless.
