Are you seeking to get into Web3 Ethereum Python growth? If that’s the case, it is best to familiarize your self with Moralis’ Python SDK! Because of this growth package, you’ll be able to seamlessly combine blockchain performance into all of your Python initiatives in solely two steps:
- Set up Moralis’ Python SDK with the next terminal command:
pip set up moralis
- Make a Moralis API name. Down beneath, you can see an instance of what it might probably seem like for querying NFT metadata:
import json
from moralis import evm_api

api_key = "YOUR_API_KEY"

params = {
    "deal with": "0xb47e3cd837dDF8e4c57F05d70Ab865de6e193BBB",
    "token_id": "3931",
    "chain": "eth",
    "format": "decimal",
    "normalizeMetadata": True,
}

consequence = evm_api.nft.get_nft_metadata(
    api_key=api_key,
    params=params,
)

print(json.dumps(consequence, indent=4))
If you would like further examples and particulars relating to the SDK, try Moralis’ official Web3 Python SDK documentation. In any other case, be part of us on this tutorial as we cowl all steps wanted for constructing a Web3 Ethereum Python utility to point out the SDK in motion!
Overview
Python is one in all as we speak’s hottest programming languages, and on this tutorial, we are going to present you the way to combine Web3 and blockchain performance into Python initiatives with Moralis. Particularly, you’ll discover ways to create an utility the place customers can sign up with their Web3 wallets. Moreover, you’ll discover ways to deal with Web3 authentication flows utilizing Python by following alongside. Because of Moralis’ Python SDK, it is possible for you to to create this utility in solely three easy steps:
- Construct a Python Flask App
- Begin the Software
- Set Up a React Frontend App
Earlier than diving into the central a part of this tutorial, we are going to cowl the fundamentals by exploring the intricacies of Python. In flip, you’ll uncover what the programming language entails and why builders use Python for Ethereum growth. Nevertheless, in case you are already aware of this, be happy to skip straight into the ”Construct a Web3 Ethereum Python App with Moralis” part of this text!
Together with the Python SDK, additionally, you will be taught extra about Moralis’ Auth API, which is used to combine MetaMask authentication. Furthermore, because of the Auth API, you’ll be able to combine many different authentication strategies with solely single code snippets. If this sounds attention-grabbing, try our guides on the way to add Coinbase Pockets login performance or add an indication in with RainbowKit.
Nonetheless, earlier than transferring ahead, join with Moralis, as you want an account to observe alongside. With an account, you’ll be able to totally leverage the ability of blockchain expertise in all future Web3 growth endeavors!
Exploring Python for Improvement
Python is without doubt one of the hottest programming languages utilized by builders all around the world. It’s intuitive and straightforward to make use of, making it one of many prime decisions amongst each new and extra skilled builders. Furthermore, Python is a so-called ”general-purpose” language. In consequence, it has many various use circumstances!
In actual fact, Python can be utilized for the whole lot from machine studying to creating easy functions, and listed below are just a few different examples:
- Knowledge Science
- Net Improvement
- Laptop Graphics
- Recreation Improvement
- Safety Testing
The ample variety of use circumstances means that Python is comparatively versatile, which is without doubt one of the language’s most vital advantages. In consequence, it’s doable to make the most of Python in a number of completely different industries, starting from finance and buying and selling to scientific and mathematical computing. Consequently, proficiency in Python might be extremely useful because it opens many doorways and growth alternatives.
Nonetheless, allow us to dive deeper into this programming language to raised perceive it within the following part, the place we briefly reply the query, ”what’s Python?”.
Python – What’s it?
Python options dynamic semantics, high-level information constructions, dynamic typing, dynamic binding, and so forth. Moreover, it’s a high-level, object-oriented programming language with an easy-to-learn syntax emphasizing readability. Therefore, it is without doubt one of the best languages to be taught, contributing to Python’s excessive adoption.

Python has many advantages and benefits. Within the following checklist, you can see three wonderful examples:
- Modules and Libraries – Python options help packages and modules, enabling code reuse and program modularity.
- Neighborhood – The programming language has an intensive group of builders contributing to the numerous pool of libraries and modules.
- Open-Supply – Python is open-source. As such, you’ll be able to each use and distribute the language without spending a dime, together with in business contexts.
As we beforehand coated within the previous part, Python is a so-called general-purpose programming language. As such, it has ample use circumstances, starting from creating easy functions to machine studying.
That covers this temporary overview of Python. Within the subsequent part, we are going to look carefully at why it is best to use Python for Ethereum growth!
Why Use Python for Ethereum Improvement?
To grasp why builders use Python for Ethereum growth, we have to return to the advantages of this programming language. As such, allow us to discover three benefits of Python in the case of Web3 growth!

- Straightforward to Study – Python is, as we beforehand touched on, an intuitive programming language. Consequently, it’s straightforward for Web3 builders to be taught and rapidly grasp, making it simpler for much less skilled builders to contribute to the blockchain ecosystem.
- Python May be Compiled or Uncompiled – Python simplifies Web3 builders’ lives as it’s a scripted language, that means it doesn’t require compilation to be understood by machines.
- Packages and Libraries – Another excuse for selecting Python in Ethereum growth is that the language options free packages and libraries. As such, builders can simply use Python to put in writing Web3-compatible code.
The advantages above are just a few examples, and there are a number of different explanation why it is best to use Python for Ethereum growth. Ensure that to discover them by yourself!
Learn how to Get Began
The simplest strategy to get into Web3 Ethereum Python growth is with Moralis. Moralis is without doubt one of the finest Web3 infrastructure suppliers providing enterprise-grade growth instruments resembling SDKs, Web3 APIs, and so forth. Amongst these superb growth instruments, you can see Moralis’ Python SDK!
The SDK is the last word Ethereum growth device, permitting you to combine Web3 performance into all of your Python initiatives seamlessly. Additionally, because of Moralis’ interoperability capabilities, you’ll be able to mix this growth package with some other Web3 APIs to create extra complicated initiatives on a number of chains. Furthermore, the Python SDK has many use circumstances, together with fetching native balances, all NFTs from a set, NFTs from a pockets, NFT metadata, and far more. Consequently, with the SDK, your Web3 Ethereum Python growth endeavors turn into extra accessible!
Nonetheless, if you wish to be taught extra about how the Python SDK works, observe alongside within the subsequent part, the place we present you the way to construct a Web3 Ethereum Python app with Moralis in solely three steps!
Construct a Web3 Ethereum Python App with Moralis
Now that you’re extra aware of the instruments required to get began with Web3 Ethereum Python growth, this part will present you the way to create an easy Web3 Python Flask app. The applying is answerable for dealing with an authentication move, permitting customers to log in with their MetaMask wallets. Together with the Python Flask utility, additionally, you will discover ways to rapidly arrange a React frontend app for testing the auth move in motion. Nonetheless, because of Moralis and the Python SDK, you’ll be able to create this utility in solely three steps:
- Construct a Python Flask App
- Begin the Software
- Set Up a React Frontend App
By finishing the steps above, you’ll be able to create an easy Web3 Ethereum Python Flask utility very quickly! Furthermore, you’ll discover ways to deal with Web3 authentication flows and make API calls by way of the Python Flask server utility. From there, you’ll be able to apply the identical rules in future growth endeavors to seamlessly add numerous authentication strategies to all of your Web3 initiatives!

Nonetheless, earlier than leaping into step one of this tutorial, the next part carefully examines the app you’re about to create. Doing so will provide you with a extra profound understanding of what you’re working in the direction of!
Demo – How Does the Web3 Ethereum Python App Work?
Earlier than leaping into step one of this tutorial, this part offers a fast demo of the Web3 Ethereum Python app. Consequently, you’ll get a greater understanding of what we’re working in the direction of. Nonetheless, right here is the app’s touchdown web page:

The touchdown web page options two components: a ”Python Web3 Authentication” heading and a ”Login” button. Urgent the ”Login” button will routinely immediate your MetaMask pockets, asking you to signal a message. Whenever you efficiently join your account, a ”problem” request is distributed to the appliance’s backend, asking Moralis’ Auth API to create a brand new Web3 login problem.
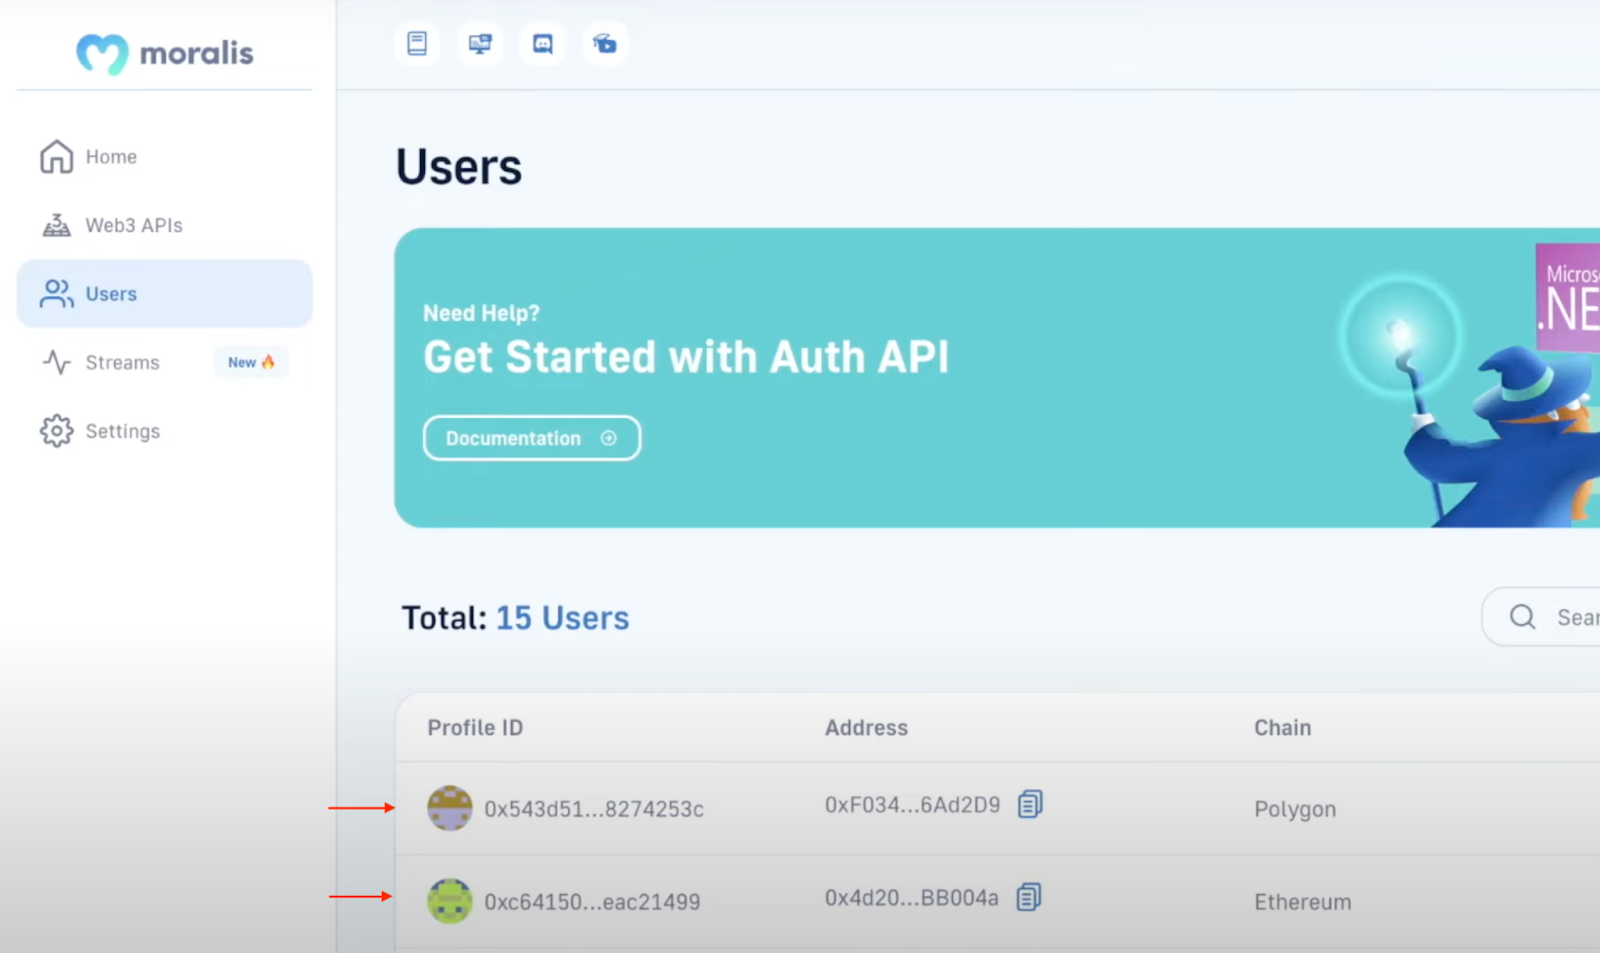
Subsequent up, an extra request is distributed from the appliance to validate the signature. If it matches, it autonomously generates a brand new ID, which is exhibited to the customers:

The applying additionally makes use of the ID to generate a brand new consumer that’s added to your ”Customers” tab in Moralis:
That’s mainly it! If you’re involved in studying the way to create initiatives just like this one, be part of us in step one of this ”Web3 Ethereum Python” tutorial, the place we present you the way to create the Python Flask utility!
Step 1 – Construct a Python Flask App
This preliminary step of the tutorial contains two sections. First, we are going to present you the way to arrange the undertaking. Second, we are going to cowl the Python Flask utility code. So, with out additional ado, allow us to take a more in-depth have a look at organising the undertaking!
To kick issues off, open your most popular built-in growth surroundings (IDE) and create a brand new undertaking folder. In our case, we will likely be utilizing Visible Studio Code (VSC). Nevertheless, you’ll be able to select the IDE you’re most aware of.
Now that you’ve a undertaking folder at your disposal, open a brand new terminal. In case you additionally went for VSC, you are able to do so by clicking on ”Terminal” on the prime after which hitting ”New Terminal”:

When you launch a brand new terminal, ”cd” into the undertaking’s root folder and run the command beneath to create a brand new digital surroundings:
python3 -m venv venv
This could present a brand new ”venv” folder in your native listing:

From there, you now have to initialize the surroundings, which you are able to do by working the next terminal command:
supply venv/bin/activate
Subsequent, guarantee you’ve gotten the most recent ”pip” model accessible. You’ll be able to examine the present model and set up any current updates by inputting the next into the terminal and hitting enter:
pip set up --upgrade pip
To prime issues off, set up all of the required dependencies by working every of the three terminal inputs down beneath in consecutive order:
pip set up flask
pip set up flask_cors
pip set up moralis
Web3 Ethereum Python Software Code
With the undertaking all arrange, it’s time to add the code for the endpoints and capabilities required for the app’s performance. As such, to kick issues off, create a brand new ”app.py” file within the undertaking’s root folder. From there, open the file and add the required dependencies on the prime:
from flask import Flask
from flask import request
from moralis import auth
from flask_cors import CORS
You’ll be able to then add the code beneath to initialize the appliance and wrap it in ”CORS”:
app = Flask(__name__)
CORS(app)
Subsequent up, add your Moralis API key:
api_key = "xxx"
Be certain that you change ”xxx” throughout the code together with your precise Web3 API key, which you’ll be able to purchase when you have a Moralis account. So, when you have not already, join with Moralis. Then, log in to the Moralis admin panel, navigate to the ”Web3 APIs” tab, copy the important thing, and enter it into the code:

From there, you have to add the 2 routes: ”/requestChallenge” and ”/verifyChallenge”.
- ”/requestChallenge” – The preliminary route is known as ”/requestChallenge”, which creates a brand new request problem every time customers need to authenticate. The central a part of the route is the ”reqChallenge()” perform that fetches the request arguments, creates a brand new variable referred to as ”physique”, will get the ”/requestChallenge” endpoint outcomes, and eventually passes it to the shopper:
@app.route('/requestChallenge', strategies=["GET"])
def reqChallenge():

    args = request.args
    physique = {
        "area": "my.dapp",
        "chainId": args.get("chainId"),
        "deal with": args.get("deal with"),
        "assertion": "Please verify login",
        "uri": "https://my.dapp/",
        "expirationTime": "2023-01-01T00:00:00.000Z",
        "notBefore": "2020-01-01T00:00:00.000Z",
        "sources": ['https://docs.moralis.io/'],
        "timeout": 30,
    }

    consequence = auth.problem.request_challenge_evm(
        api_key=api_key,
        physique=physique,
    )

    return consequence
- ”/verifyChallenge” – As soon as a consumer indicators the message on the shopper facet, this second route is answerable for verifying the problem. Additional, ”/verifyChallenge” comprises a ”verifyChallenge()” perform answerable for fetching the arguments from the request endpoint, creating one other ”physique” variable, getting the outcomes from the Auth API, and eventually passing the outcomes to the shopper:
@app.route('/verifyChallenge', strategies=["GET"])
def verifyChallenge():

    args = request.args
    physique={
        "message": args.get("message"),
        "signature": args.get("signature"),
    }

    consequence = auth.problem.verify_challenge_evm(
        api_key=api_key,
        physique=physique
    )

    return consequence
Lastly, add the code beneath following the 2 routes to specify the place you need to run the app:
if __name__ == "__main__":
    app.run(host="127.0.0.1", port=3000, debug=True)
That’s it for the whole thing of the code! Your ”app.py” file ought to now look one thing like this:
from flask import Flask
from flask import request
from moralis import auth
from flask_cors import CORS

app = Flask(__name__)
CORS(app)

api_key = "xxx"

@app.route('/requestChallenge', strategies=["GET"])
def reqChallenge():

    args = request.args
    physique = {
        "area": "my.dapp",
        "chainId": args.get("chainId"),
        "deal with": args.get("deal with"),
        "assertion": "Please verify login",
        "uri": "https://my.dapp/",
        "expirationTime": "2023-01-01T00:00:00.000Z",
        "notBefore": "2020-01-01T00:00:00.000Z",
        "sources": ['https://docs.moralis.io/'],
        "timeout": 30,
    }

    consequence = auth.problem.request_challenge_evm(
        api_key=api_key,
        physique=physique,
    )

    return consequence


@app.route('/verifyChallenge', strategies=["GET"])
def verifyChallenge():

    args = request.args
    physique={
        "message": args.get("message"),
        "signature": args.get("signature"),
    }

    consequence = auth.problem.verify_challenge_evm(
        api_key=api_key,
        physique=physique
    )

    return consequence


if __name__ == "__main__":
    app.run(host="127.0.0.1", port=3000, debug=True)
Step 2 – Begin the Software
Now that you’ve written all of the code for the Web3 Ethereum Python Flask utility, all that is still is to run the undertaking. As such, open a brand new terminal as soon as once more, enter the next, and hit enter:
python3 app.py
That is it! Your utility ought to now launch on “localhost 3000“! That utterly covers the Ethereum Python Flask utility. Nevertheless, to show the way it works and check out the performance, the next part will briefly present you the way to arrange a React utility from which you’ll be able to name the endpoints!
Step 3 – Set Up a React Frontend App
The ultimate step of this ”Web3 Ethereum Python” tutorial is to arrange a frontend React utility. This app can name the endpoints and show how the Web3 authentication move works in follow. Nonetheless, allow us to take a more in-depth have a look at the way to set it up!
To make this third step as accessible as doable, we are going to use an already-developed React utility, and you could find the whole code within the GitHub repository down beneath:
Web3 Ethereum Python Software Docs – https://github.com/MoralisWeb3/youtube-tutorials/tree/essential/Web3AuthPython
All you have to do is go to the repository and clone the undertaking to your native listing. When you clone the undertaking, it is best to now have a file construction just like the one proven on this picture:

From there, now you can spin up this app by working ”npm run begin” in a brand new terminal!
That’s it for this text! If questions stay otherwise you expertise hassle throughout the tutorial, be happy to take a look at the official Web3 Python SDK documentation, which is able to reply any of your queries! You may as well watch the video beneath from the Moralis YouTube channel. The next clip breaks down the tutorial from begin to end, the place one in all our proficient engineers walks you thru the whole course of:
Python for Web3 Ethereum Improvement – Abstract
On this article, you discovered the way to create an easy Web3 Python utility for dealing with a Web3 authentication move with Moralis. What’s extra, because of Moralis’ Python SDK, you have been ready to take action in solely three steps:
- Construct a Python Flask App
- Begin the Software
- Set Up a React Frontend App
In case you discovered this tutorial useful, contemplate trying out further guides right here at Moralis’ Web3 weblog. As an example, discover ways to arrange automated Web3 notification emails or learn up on Ethers.js vs Web3 streams!
Furthermore, if you wish to turn into a more adept blockchain developer, enroll in Moralis Academy instantly! The academy gives a number of programs for brand spanking new and extra skilled builders. As an example, be taught the fundamentals of React growth with the next course: ”React Net Improvement 101”.
Nonetheless, if you wish to create Web3 Ethereum Python functions, be sure to enroll with Moralis. You’ll be able to create your account without spending a dime; it solely takes a few seconds!
